
Stucco is a versatile and attractive siding option for homes. Its composite materials naturally deter fire, rot, mold, and termite infestations. However, moisture penetration can cause cracks and holes in stucco walls.
Homeowners interested in doing a DIY stucco repair project should understand the materials, costs, and repair process. They should also know when to consult a professional like Stucco Repair Philadelphia.
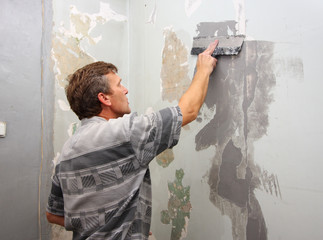
If you have a stucco-covered building, it’s a good idea to keep an eye on it for cracks and other damage. Stucco, though highly weather-resistant, is not impervious to damage and needs regular maintenance to keep it in good condition. If you spot any cracks, it’s a good idea to address them as soon as possible to prevent moisture penetration and subsequent damage like wood rot, mold growth, and peeling paint.
Hairline cracks less than a quarter inch wide are relatively easy to repair. They can be filled with standard caulking. However, elastomeric caulks are better choices for this type of work since they offer higher durability and adherence to stucco.
Before you apply your chosen caulking, wet the area surrounding the crack with a hose or spray bottle. This helps ensure that the caulk won’t dry out and shrink around the crack. It will also help to ensure that the caulk adheres properly to the wall and that the crack is adequately sealed.
When the caulking is applied, let it dry before painting it. Be sure to use a paint that is compatible with stucco, such as latex or acrylic, for the best results. If you have a smooth stucco texture, reapply the caulking until it is flush with the finish to ensure that there are no noticeable “hard lines” and that the repair blends in seamlessly. If you have a rougher stucco texture, try experimenting with sanding the caulking before applying it to get a better match.
While surface cracks are relatively common, a more serious problem that should be addressed immediately is if the cracks extend through the plaster and towards the lath. In these cases, the repair process is more involved and requires more time. First, remove any broken pieces of plaster or stucco with a hammer and a cold chisel. Then, carefully widen the crack by at least a quarter inch using a cold chisel and a hammer. Be careful not to disturb any areas of existing lath if possible, and wear heavy leather gloves and a dust mask when doing this.
Holes
The appearance of holes in stucco can be a real eyesore for your home. Fortunately, they are often quite easy to repair. There are three primary reasons for them to occur: lousy stucco work: Occasionally, the company that performs the stucco work does a poor job that leads to cracking or even holes. This can be caused by the wrong mixing proportions, improper mixing, or simply bad workmanship. The contractor may also not have used the proper building methods, such as tying the drywall to the framing. Extreme Weather: Hot and cold temperatures can cause shrinkage, expansion, and contraction of the stucco. This can create stress, which can lead to cracking and the formation of holes.
The first thing you will want to do to repair a hole in your stucco is to clean it out. Using a wire brush, you should be able to scrape away any loose material that is in the hole. If it is particularly large, you may need to use a hammer and chisel to get rid of any remaining material. Once you have cleaned the area, it is important to blow out the hole in order to eliminate any debris that could negatively affect the bond of the repair materials.
Next, you will want to prepare the area for the stucco patching and finishing products that you are going to use. You will want to make sure that the hole is properly ventilated while you are working on it. You will also need to remove any loose paint and debris from the surface of the hole. Once the surface of the hole is prepared, you can apply the patching product to the area and then finish it off with a piece of fiberglass mesh.
You will then need to apply a second layer of the patching compound to the area. You will need to ensure that it is completely cured before applying the fiberglass mesh and then the final layer of stucco. When finished, you will need to sand down the patch to smooth it and blend it into the surrounding stucco.
Loose Stucco
Stucco cracks and holes can be patched, but if loose stucco is falling away from the wall, it can be more of a problem. It can allow water to seep behind the surface and cause hairline cracks or soft spots, and it can expose the underlying wood lath support to moisture, which will deteriorate over time.
If you notice an area of loose stucco, it’s important to take care of the repair right away. You may be able to catch the problem before it worsens by regularly checking for loose areas and repairing them immediately.
A professional can help you replace old traditional stucco with a synthetic product that is more resistant to cracking and requires less maintenance, but for those who don’t want to invest the money, there are several steps homeowners can follow to repair loose stucco. Start by removing the loose material. Wear gloves and eye protection while attempting to break up the stucco with a cold chisel or ballpeen hammer, being careful not to damage the underlying wooden lath. Then use a wire brush to remove any remaining residue.
Once the damaged stucco has been removed, check to make sure that the metal mesh beneath is still intact and not showing signs of rust. If necessary, cut a piece of new mesh to size using metal snips and staple it to the lath. Then spray the area with water and apply a coat of waterproof caulking to the exposed lath.
For small holes and larger cracks, mix a batch of pre-mixed stucco patch material according to the manufacturer’s directions and fill the hole with it. When it’s dry, use a mason’s trowel or putty knife to smooth the surface and apply a second coat that’s dampened. When that coat is dry, etch the surface and apply a third coat, which will be the final color of the repaired area.
Homeowners can even apply a pigment to their stucco mix to match the existing color of the walls. But it’s a labor-intensive process that requires patience and a good eye for matching colors. If you’re not comfortable tackling this type of project, a stucco contractor will be happy to handle it for you.
Preparation
Stucco is durable and an attractive addition to any home, but if your stucco is showing signs of damage, you shouldn’t ignore it. If left untreated, it can deteriorate and eventually cause moisture penetration in the wall system. Ultimately, this can lead to mold or efflorescence (a white coating that develops on masonry surfaces after prolonged exposure to water). It’s important to take a close look at your stucco and determine the root cause of the problem before attempting to fix it.
If you notice cracks or holes in your stucco, the first step is to clean the area using a wire brush. You can also use a pressure washer, but remember to set it at a low setting; too much pressure could cause the cracks to widen or break. Once you’ve cleaned the area, you should let it dry for about 24 hours.
Once the area is completely dry, you’ll need to prepare it for a new coat of stucco. If the damaged area is exposed, you’ll need to cover it with builder’s paper. For small areas, you can trim a piece of grade D building paper to the size of the patch and fasten it to the lath with roofing nails. For larger areas, you may need to cut a piece of galvanized metal mesh stucco lath that matches the original wall material. It’s important to have this in place because it will create an effective moisture barrier.
For holes, you should also place a piece of the galvanized metal mesh in the hole and then cover it with more grade D building paper. This will help prevent the rust and corrosion that can occur in the hole over time. You can use a utility knife or an exacto knife to shape the paper to fit the hole and then secure it with roofing nails.
After a layer of grade D paper has been put in place, you’ll apply a scratch coat of stucco to the surface. This should be a thin layer that’s a few inches thick. It should be lightly textured and then colored.